Welcome at Inshore Safety
Write us to: info@inshoresafety.com or fill the form.

Phone
+36 70 336 3907
Working Hours
We are happy to meet you during our working hours.
- MonCET 8:00 - 17:00;
- TuesCET 8:00 - 17:00;
- WedCET 8:00 - 17:00;
- ThurCET 8:00 - 17:00;
- FriCET 8:00 - 15:00;
Installation of CLS Upgrade Kit
For the full Instruction For Use with all the safety warnings please click here.
The CLS Upgrade Kit is available in two product variants. Always select the variant appropriate for the type of rescue device used.
- Variant for Horseshoe Lifebuoys: The plastic insert is curved longitudinally and has a flat cross-section, allowing proper fit to curved flat surfaces. Production number prefix: IS-CLS-H
- Variant for Ring Lifebuoys: The plastic insert is curved both longitudinally and transversely, allowing it to conform to the toroidal inner surface of standard ring lifebuoys. Production number prefix: IS-CLS-R
⚠ WARNING! If the cross-sectional shape of the rescue device differs significantly from standard designs, the plastic insert may not fit correctly. In such cases, the CLS Upgrade Kit is not compatible with the rescue device.
Rescue devices may also vary in size. The CLS Upgrade Kit is designed to allow limited size adjustment. Compatibility is considered acceptable if:
– the line holder can be fully inserted into the storage pockets, and
– the plastic handle securing hook-and-loop fastener can be tightened so that the line holder cannot move or fall out unintentionally.
Adjustment is possible using the overlap length of the hook-and-loop fasteners, and the vertical positioning of the storage pockets via the openings in the plastic insert.
Assembly
The assembly procedure is identical for ring lifebuoys and horseshoe lifebuoys. For clarity, the procedure is illustrated using a horseshoe lifebuoy.
- Insert the plastic insert through the opening in the harness and position it symmetrically.
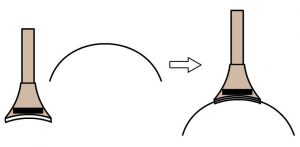
- Thread the straps of the storage pockets through the appropriate openings in the plastic insert so that the pockets open upwards, and they are positioned on the same side as the webbing handle.
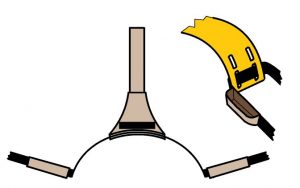
- Carefully compress the plastic insert and place the harness into the inner curve of the rescue device.
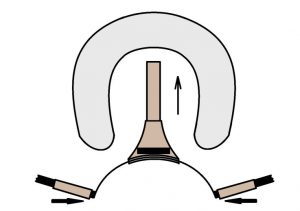
- Secure the harness tightly around the rescue device, ensuring that the hook-and-loop fastener is routed underneath the webbing handle. The hook-and-loop fastener must overlap onto the rear surface of the rescue device by at least 50%. Verify that the fastener is fully and securely closed along its entire length.
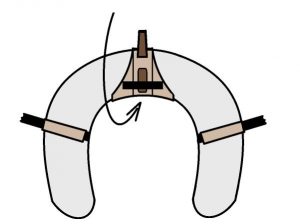
- Secure the storage pockets tightly around the rescue device. The hook-and-loop fasteners must overlap by at least 5 cm (2”).
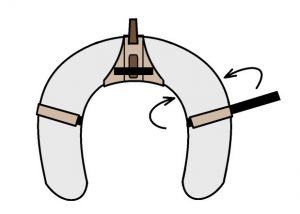
- Check that the floating rescue line is fully wound onto the line holder in a figure-eight pattern. Remove any additional attachments securing the line to the plastic handle.
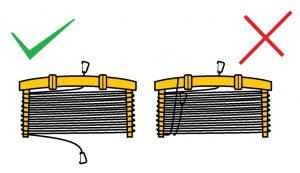
- Attach the black carabiner to the harness towing eye and verify that the carabiner is fully closed and locked.
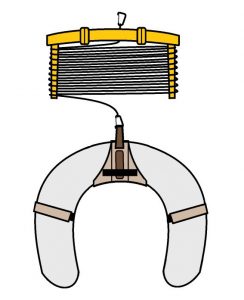
- Slide the line holder into the storage pockets. Tighten and secure the plastic handle retaining hook-and-loop fastener so that the line holder cannot move or fall out. If the line holder can move, reposition the storage pockets using a higher opening in the plastic insert. If the securing fastener has insufficient overlap, reposition the storage pockets using a lower opening.
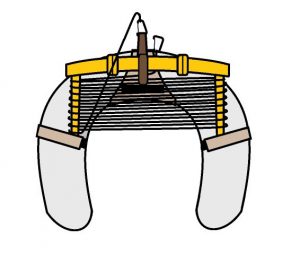
⚠ WARNING!
- Incorrect positioning of the storage pockets or insufficiently tightened hook-and-loop fasteners may cause the line holder to fall out, delaying or preventing a rescue.
- During installation, ensure that the harness, storage pockets and straps do not obstruct the use of the grab line of the rescue device, and do not cover or reduce the visibility of reflective elements.
Redesigned tools – Simplified tasks
Innovation for Boating Safety
